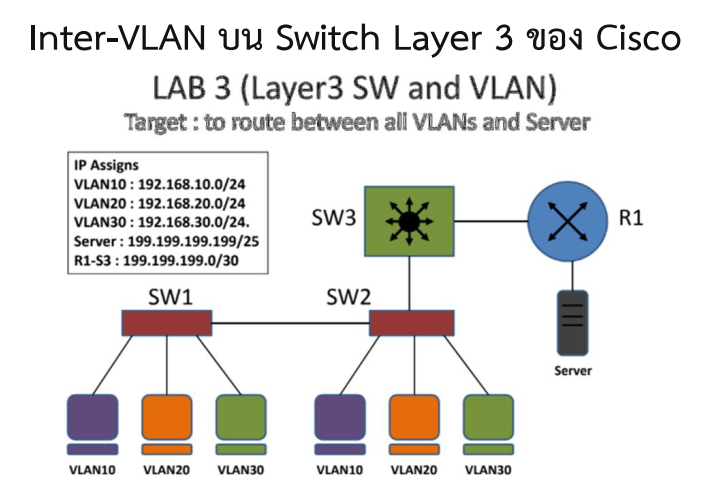
การทำ Inter-VLAN Routing บน Switch Layer 3 ของ Cisco เพื่อให้อุปกรณ์ในแต่ละเครือข่ายสามารถติดต่อกันได้ โดยตัวอย่างจะทำการเชื่อมต่อ Switch L2 ที่มีวง VLAN อยู่ 3 วง เข้ากับ Switch L3

โดย ทำการ set Switch L3 ได้ด้งนี้
1) Enable Layer 3 routing และ สร้าง Trunk port เพื่อทําหน้าที่ Route Traffic ระหว่าง VLAN
2) Config interface เชื่อมต่อไปยัง router เครือข่ายอื่น
3) Config VLAN ให้ทำการสร้างเลข VLAN และกำหนดชื่อ VLAN ตัวอย่าง สร้าง VLAN10 VLAN20 VLAN30
4) Config SVI ( Switch Virtual Interface ) ให้ทำการสร้าง Interface VLAN และใส่ IP Address
5) กำหนด Routing protocols แบบ RIP version2 ให้ switch L3

1) Enable Layer 3 routing และ สร้าง Trunk Port โดยปกติค่า encapsulation ของ Trunk Port นั้นจะอิงตามมาตรฐานของ IEEE 802.1Q
Interface gigabitEthernet 0/1 ของ SW-L3 เชื่อมต่อกับ Switch L2 (SW2)
*Enable Layer 3 routing
Switch(config)#hostname SW-L3
SW-L3 (config)#ip routing
SW-L3(config)# interface gigabitEthernet 0/1
SW-L3(config-if)#switchport trunk encapsulation dot1q
SW-L3(config-if)#switchport mode trunk
2) Config interface เชื่อมต่อไปยัง router เครือข่ายอื่น
SW-L3(config)# interface GigabitEthernet0/2
SW-L3(config-if)# description To Server
SW-L3(config-if)# no switchport
SW-L3(config-if)# ip address 199.199.199.1 255.255.255.252
3) Config VLAN ให้ทำการสร้างเลข VLAN และกำหนดชื่อ VLAN ตัวอย่าง สร้าง VLAN10 VLAN20 VLAN30 SW-L3(config)#vlan 10
SW-L3(config-vlan)#name VLAN10
SW-L3(config)#vlan 20
SW-L3(config-vlan)#name VLAN20
SW-L3(config)#vlan 30
SW-L3(config-vlan)#name VLAN30
4) Config SVI ( Switch Virtual Interface ) ให้ทำการสร้าง Interface VLAN และใส่ IP Address ที่จะเป็น Gateway ให้กับhost ( PC,Notebook,Server) ในแต่ละ VLAN ดังตัวอย่าง
SW-L3(config)#interface vlan 10
SW-L3(config-if)#ip address 192.168.10.1 255.255.255.0
SW-L3(config-if)#description link-to-vlan-10
SW-L3(config)#interface vlan 20
SW-L3(config-if)#ip address 192.168.20.1 255.255.255.0
SW-L3(config-if)#description link-to-vlan-20
SW-L3(config-if)#interface vlan 30
SW-L3(config-if)#ip address 192.168.30.1 255.255.255.0
SW-L3(config-if)#description link-to-vlan-30
5) กำหนด Routing protocols แบบ RIP version2 ให้ switch L3
SW-L3 (config)# router rip
SW-L3 (config-router)#no auto-summary
SW-L3(config-router)#version 2
SW-L3 (config-router)# network 199.199.199.0
SW-L3 (config-router)# network 192.168.10.0
SW-L3 (config-router)# network 192.168.20.0
SW-L3 (config-router)# network 192.168.30.0
ตรวจสอบว่ามีการ routing ถ้า config ถูกต้องเมื่อทำการ show ip route Switch Layer 3 ต้องรู้จัก Network VLAN10,VLAN20,VLAN30 และ network ภายนอก

ตรวจสอบ configuration ของ switch layer 3
SW-L3#show running-config

ตรวจสอบ configuration ของ Router R2 ใช้ routing protocols แบบ RIP Ver2

ผลการทดสอบ เครื่อง server และ computer PC0 – PC5 ทุกเครื่อง ping กันเจอ


